Main Page
ToroHack Registration[edit | edit source]
- Access , this will require using your student email and will take you to the zoom events page.
- Be sure you are using your student email tied to your zoom account, and the option to register should be present beside the basic information.
-
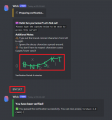
 Eventbrite page with Zoom Events registration link.
 -
 Zoom Events page with registration option.


ToroHack Discord[edit | edit source]
Event participation and collaboration (i.e. selecting teams and making contact with teams) will be handled via a Discord server made exclusively for the event. [ToroHack Discord: LINK TBA]
Rules & Etiquette[edit | edit source]
- Treat everyone with respect. When in doubt: Do unto others as you would have them do unto you.
- No NSFW (includes hate speech, profanity, inappropriate images, racial slurs)
- Users must provide verifiable information(emails, real name, etc.)
- Do not send any malware or harmful files.
- Do not spam any chats with self-advancement (Self-promotion), spam, and irrelevant links.
- For any concerns that you may have please contact a moderator.
- No cheating allowed! Anyone participating in the Hackathon must stay within their teams.
- Discord names and avatars must be appropriate.
- Do not invite anyone not affiliated.
- Any form of harassment such as blackmailing, doxxing, inappropriate DMs, results in an immediate and permanent ban.
- Follow all staff instructions immediately and at all times.
- You may not share content that disregards anybody's licensed innovation, property, or other rights.
- Do not record voice channel conversation, unless allowed.
- Please maintain a civil chat environment.
- Respect Everyone's Privacy.
(Violation of these rules can be grounds for a timeout or removal of this server. Once you've read these rules and agree, react down below to be allowed into the server)
Entering the Server[edit | edit source]
- You will be taken to a landing channel where you must react with a specified emoji as a sign you've read the rules, followed by a verification bot contacting you personally to confirm you aren't a bot yourself.
- After confirming this, you'll be manually sorted into a team, then you will be granted access to the corresponding team text and voice channels.
- Note: One user should only be in one team text/voice channel pair at a time, observe Rule #7 Above.
-
 Initial verification.
 -
 Captcha verification.
 -
 Emoji confirmation.


ToroHack Hackathon Participation: How do I...[edit | edit source]
Use Scoring Engine to Participate?[edit | edit source]
Getting Started[edit | edit source]
-
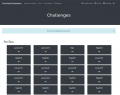 Challenge questions main page.

To select a question to attempt, simply click on any one of the squares. A smaller window will appear with a question prompt and an entry field. Once you're sure of the answer you've entered, click on 'submit', and if it is correct, the point(s) that question is worth belong to you.
-
 Select any question square.
 -
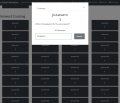 Entering an answer.


- PASSWORD HASHES is where you will find the .txt files that the PASSWORD CRACKING questions rely upon as a reference for all the questions in that section. You should be able to take each of these files and feed it into your cracking software of choice.
- USERS maintains a list of current players who are properly registered with the site.
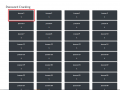
- SCOREBOARD shows the ongoing amount of accumulated points throughout the competition.
- CHALLENGES is where you will go to participate. You will be presented with a large list of questions you can choose to attempt freely, each one worth it's own individual number of points.
Challenge Types[edit | edit source]
Challenges are presented in a Jeopardy!-style grid in which you can select any question at your leisure and make up to 3 attempts at entering the correct answer.
PEN TEST[edit | edit source]
To participate in these types of questions, contact support and you will be given credentials to log into a remote Kali Linux machine that contains the necessary materials to answer the relevant questions. You can access this page at the link above.
PASSWORD CRACKING[edit | edit source]
Each question will ask you to refer to a specific username listed in the text files featured in the PASSWORD HASHING tab; find the corresponding username and it's hashed password, decrypt it, and enter the decrypted password to score the point. You will have 3 attempts, and passwords are case sensitive.
HIDDEN MESSAGES[edit | edit source]
Each question will provide an image for you to download and insert into your steganographic decoder of your choice (See below section "Cipher Decoding") that will produce a string beginning in either CAHSI or TORO. You will have 3 attempts, and strings are case sensitive.
Use Bash Terminal?[edit | edit source]
- Basic Bash Commands
- Interacting with files and directories
- pwd- print working directory

- ls- to list all directories
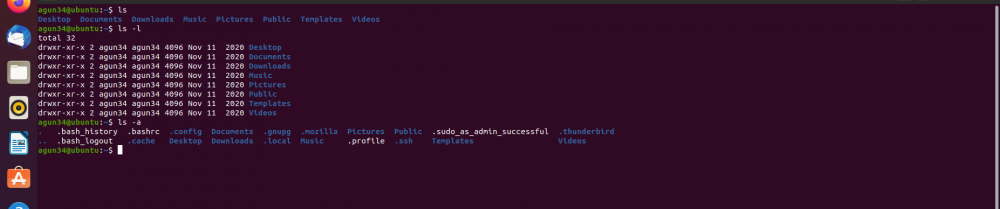
- cd- change directory
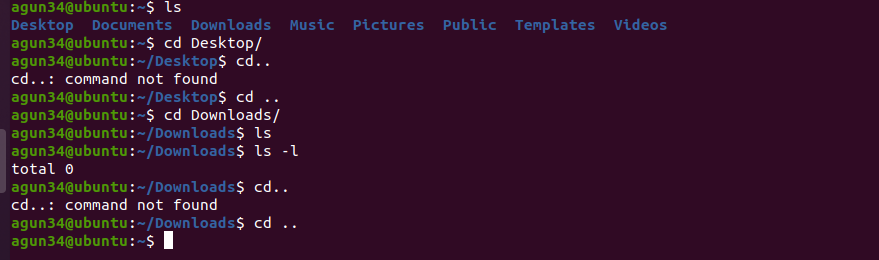


- cat- print/concatenate

- -h or - - help, bring up in end of every command.
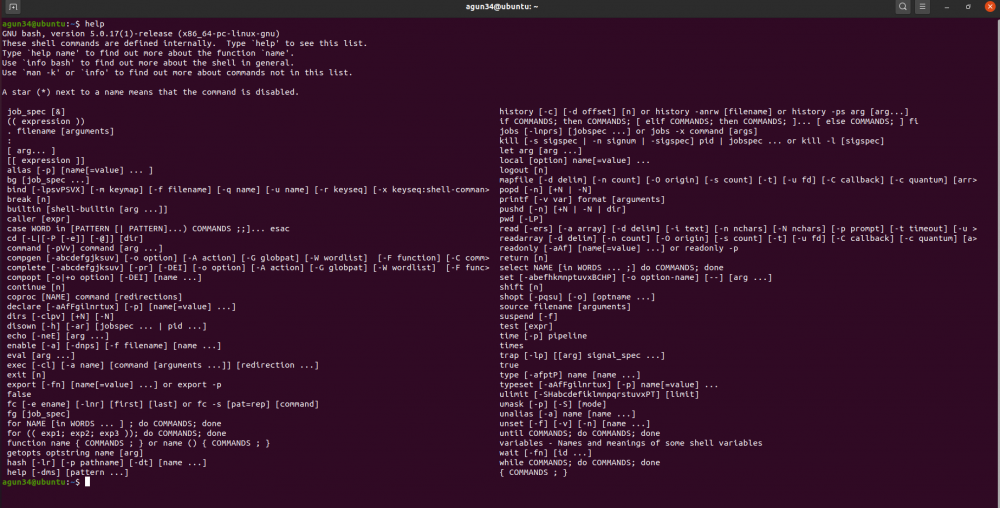


- If interested more about commands and info about them, please use link below
- https://dev.to/awwsmm/101-bash-commands-and-tips-for-beginners-to-experts-30je
Solve Steganography Questions?[edit | edit source]
[Possible Websites to Decode Steganogprahy Questions.]
Installing steghide (Using Linux):
- Open your Linux Command Line
- On the command line type “sudo apt install steghide”
#Then type “man steghide”
- Dialogue/message should come out out indicating successful installation
- Type “clear” to leave and continue
To extract embedded data from .jpg:
- Get the file/image name you want to extract (EX. stg.jpg)
- If you need to add a directory, here is an example
- Then type “steghide extract -sf stg.jpg” to extract
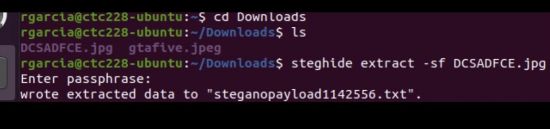
- If a password/passphrase is asked just press enter unless you have a password for it
- A flag message should appear/reveal like this “TORO-AAAAA-#####”


Extracting information using Futureboy
- Visit the link: https://futureboy.us/stegano/encinput.html
- Navigate to the near bottom, offering a link to “decode a file”.
- Click the link.
- Download and input the corresponding file you want decoded.
- The following flag/message should come out as: “TORO-AAAAA-#####”.
- Copy said decoded message, and input into the prompt.
Extracting image information using SourceForge:
- Visit the link: http://steghide.sourceforge.net/
- Download the most recent release.
- Extract the file.

- Place the steghide folder in C:\Program Files.
- Search “edit environment variables.”
- Go to advanced, click Environment Variables

- Head to System Variables, Click Path, hit edit.
- Click Edit, go to Add, add the following file path where steghide is located.
- Go to Command Prompt
- Type “cd” to change directory to wherever you stored your image.
- Type steghide -sf “IMAGENAME.jpg”
- You should receive a text file with the decoded flag.

- Copy and paste decoded flag into the prompt.
Solve Password Cracking Questions?[edit | edit source]
Password Cracking can be accomplished by comparing stored passwords to a word list or by using techniques to generate credentials. Passwords are most likely encrypted before being saved as hashes.
Hash functions are mathematical functions that convert random-length inputs into encrypted fixed-length of outputs. Brute-force and dictionary attacks are the two most used techniques to determine valid passwords but are not limited to other methods like Rainbow attack, Malware, Phishing, Guessing, etc.
The tool that we are going to use for password cracking is "John the Ripper", which uses a dictionary list (wordlist) approach. [For more info https://www.openwall.com/john/]
John the Ripper is already loaded with its default wordlist and can be found on this location /usr/share/john/password.lst
Also, rockyou.txt is another big wordlist collection, that can be downloaded and is pre-loaded in Kali Linux on this location /usr/share/wordlists as rockyou.txt.gz which will be on a compressed file.
To extract use this command:
sudo gunzip rockyou.txt.gz
![]()
Once we got the password hashes, first of all, we have to save it as a hash file on our Linux machine using a text editor (I prefer nano) or even use the GUI interface for that.

Let’s say we made a password hash file as "hashlist.txt" and then we use our wordlist(s) and application “john” to crack the hash file.
The method we are going to use:
john hashlist.txt --wordlist = [wordlist path]
john hashlist.txt -- wordlist = [wordlist path] --format = [different encryption formats]
Step1: To install:
sudo apt install john
![]()
Step2:
john hashlist.txt --wordlist=/usr/share/john/password.lst
![]()
or,
john hashlist.txt --wordlist=/usr/share/john/password.lst --format=sha512crypt
![]()
Step3: To see the cracked password: john -- show [hash filename]
john --show hashlist.txt

Cipher Decoding[edit | edit source]
Cipher is another way of encoding / decoding messages. A cipher uses an algorithm to convert plaintext to ciphertext. While it modifies and hides the plaintext, it has no sense on its own.
For example, I was given an encoded message XZHSR-HLCRA-17491.
To decode this message, go to this site: http://rumkin.com/tools/cipher/
You can see a list of tools/methods to use on the left-hand side.

Then keep using one of these above-mentioned methods to find the correct answer.

Here I have used a Tool called “Atbash Cipher” and decoded the correct answer as CASHI-SOXIZ-17491
Detect Other Devices On My Network?[edit | edit source]
[INSERT INSTRUCTIONS HERE]
There are many ways on detecting devices on a network, here are two simple ways on finding them efficiently.
Nmap or Network Mapper[edit | edit source]
Installation
First, you have to install nmap if you haven’t installed it. If you’re not logged in as root, type
sudo apt-get install nmap

Find IP Address
To detect the device on a network, the first task is to figure out what is the IP address on your device. Type
ip address
The address can be found in the position of the highlighted block.

Using Nmap
By using nmap to scan the ports on each device and figure out which ones are open, type
nmap 192.168.199.138/24
You may have a list looks similar to the picture below.

Then you’ll find all the open port on this network by typing
nmap 192.168.199.140 -p 1-65535

Further Using of Nmap
If you want to find further details of using nmap, type
nmap --help
This command will give you a long list with description of all extension you can use.

Zenmap[edit | edit source]
Installation
First, heading to download the Zenmap package from the website: https://nmap.org/download.html
Scroll down to find Optional Zenmap GUI (all platforms) and save the .rpm file.

Go back to terminal, to get everything up to date type
sudo apt-get update
Install Alien to help us install Zenmap by typing
sudo apt install alien

Use Alien to deal with the .rpm file by type
sudo alien zenmap-7.92-1.noarch.rpm
then you can receive a .deb file in your Downloads.

Type all following command for additional package:
wget http://archive.ubuntu.com/ubuntu/pool/universe/p/pygtk/python-gtk2_2.24.0-5.1ubuntu2_amd64.deb
wget http://azure.archive.ubuntu.com/ubuntu/pool/universe/p/pygobject-2/python-gobject-2_2.28.6-14ubuntu1_amd64.deb
wget http://security.ubuntu.com/ubuntu/pool/universe/p/pycairo/python-cairo_1.16.2-2ubuntu2_amd64.deb
Then install all aditional packages in this order:
sudo dpkg -i python-cairo_1.16.2-2ubuntu2_amd64.deb
sudo dpkg -i python-gobject-2_2.28.6-14ubuntu1_amd64.deb
sudo dpkg -i python-gtk2_2.24.0-5.1ubuntu2_amd64.deb


To finally install Zenmap, type
sudo dpkg -i zenmap_7.92-2_all.deb
and then you can find Zenmap in your system.

Using Zenmap
First, find out the ip address in the terminal by typing
ip address
To open Zenmap by typing
sudo zenmap
Put your IP address in the Target box, on Profile box, you can choose different type of scan, such as quick scan or ping scan after you click the Scan button. You can find the results on the Ports/Hosts tab.


Install a Linux Virtual Machine on Windows?[edit | edit source]
There are many different software's for Virtual Machines to emulate different OS's for computers. We will be downloading Oracle's VirtualBox on Windows machines and running Ubuntu Linux.
1. The first step is to click the link https://www.virtualbox.org/wiki/Downloads and click on Windows hosts under VirtualBox 6.1.32 platform packages. The .exe file should begin downloading.

File:Screenshot2022-03-241428.04.png
2. After the .exe file is finished downloading the next step is to click on the .exe file and run the set up wizard to install VirtualBox on your machine.
3. Once you have VirtualBox installed you must download the Ubuntu .iso file from the link https://ubuntu.com/download/desktop This file may take a few minutes to download.

4. After the .iso file is downloaded open VirtualBox and click on New to set up a new Virtual Machine.
5. You can name the machine anything you want but for this purpose name it ubuntuLinux. Select Linux as the type and Ubuntu (64-bit) or (32-bit), depending on your system, and click next.
6. The next step is to choose the memory size. Change this to the recommended settings.
7. For the hard disk setting select "create a virtual hard disk now" and click create.
8. Then select VDI(virtual disk image) and click next.
9. Then select Dynamically allocated for the storage on physical hard disk option.
10. Set the file location and size to your preference then select create.
11. After creating the ubuntuLinux VM, highlight it and select the settings button.
12. Select storage and click empty under Controller: IDE and upload the Ubuntu .iso file you downloaded to the blue disk icon next to Optical Drive.

13. After this step is done you can start the ubuntuLinux VM in VirtualBox. After starting the ubuntuLinux VM click on INSTALL Ubuntu and run the setup wizard. Set up your account and the VM is ready to use!
Install a Linux Virtual Machine on Mac?[edit | edit source]
VirtualBox is a type of freeware to download virtual machines and for this instance, it will be for any Mac OS. We will be using VirtualBox and Ubuntu Desktop.
VirtualBox Installation[edit | edit source]
1. Follow the VirtualBox link and download: VirtualBox Download

2. After opening the file and following the pop-up windows open VirtualBox

3. Click on NEW, which is a blue button

4. In Name and Operating System, choose Linux for type of installation
5. Select the version of Linux you would like to use and then hit continue

6. In Memory Size, choose the suggested minimum memory size and then hit continue

7. In Hard Disk, choose Create a virtual hard disk now option and click create

8. Hard Disk File Type section you must choose VDI (VirtualBox Disk Image) and hit continue

9. In Storage on Physical Hard Disk, choose Dynamically Allocated

10. Select a file size and location and hit create.


These steps are only for the VirtualBox Installation.
Ubuntu Installation and Use[edit | edit source]
1. Follow the Ubuntu link and download: Ubuntu Download

2. In settings, under Security & Privacy, choose General, unlock the “make changes” padlock and put your password in. At the bottom of the
pop-up window it will say “System Software from Developer ‘Oracle America, Inc.’” Click allow, lock the “make changes” padlock and
proceed back to VirtualBox

3. Select the Virtual Box Manager, and choose start

4. Click on the yellow File Icon and it will prompt a new window
5. In the new window select Add at the top left
6. Search for your Ubuntu Download and open the file
7. Choose the Ubuntu Download and press Start

8. Select the language and click continue

9. Choose the keyboard layout

10. The next window allows you to select between normal and minimal installation. In general if you are using the regular applications select
Minimal, if you are preloaded games, media players, and utilities go for the Normal.

11. It recommendable to select in the installation type “Erase disk and install Ubuntu” if you are a beginner and Click on Install Now button
prompts the permission to create an automatic partition table

12. Make the selection on the time zone

13. Pick a name and password and click in continue and the installation will start

14. The files will begin to copied in the computer

15. When the application is completed, a pop up of confirmation will appear asking restart the computer

16. After restarting the computer, you will see the Ubuntu desktop

Settings adjustment
1. In the VirtualBox application choose your virtual machine and choose settings.
2. Adjust your display however you please and click “ok” to save into your virtual machine.
Set-up in VM
1. The Linux Virtual Machine will prompt you to make a username and password.
2. After creating your username and password you will be able to use the Linux VM freely.