Setting Up WRCCDC Clones In ProxMox
Creating the VMs
Installing and Configuring the VMs
Convert to Template and Begin to First Clone
Now that you have completed the virtual machines we can turn them into templates for cloning in the Proxmox system. First thing we need to do is make sure that all the machines that you want to turn into templates are turned off. In Proxmox you will want to select each machine and connect to it and use the console tab to view the machine. We want to shut down the machine manually using virtual machines operating systems' normal method to turn it off in order to minimize the chance of a shut down error being cloned to the new machines. When the machine is fully shut down the screen will look like this.

Image1: Console view of a fully shut down machine. Some machines will shut down quickly but others like the windows machine or pfsense may take several minutes to shutdown. If the machine gets stuck shutting down you can manually stop the machine by clicking the arrow on the shutdown button at the top of the viewer. From there you can select ‘stop’ to immediately stop the machine.

Image 2: The stop button in the drop down menu from the shutdown button. Now that all the machines are turned off we can convert them to templates. To do this you will right click on the machine you want to make into a template and from there you can select ‘convert to template’ then you will confirm and the selected machine is the one you want to turn into a template.
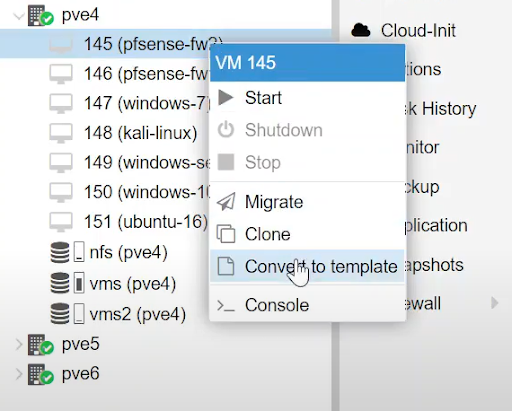
Image 3: right click and selecting convert to template. Once the template is made the icon of the machine will change.

Image 4: You can see the first three have been converted into templates. Repeat the process for all the machines you want to convert. Now we are ready to start cloning machines, to get started you will need to right click on the template that you want to clone and then select the ‘clone’ option.
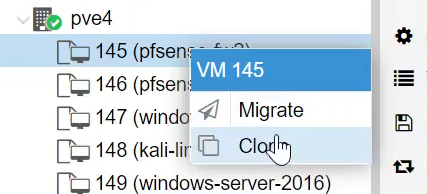
Image 5: right click and select clone to start cloning the machine. Once you click the clone button a window will appear with several options.
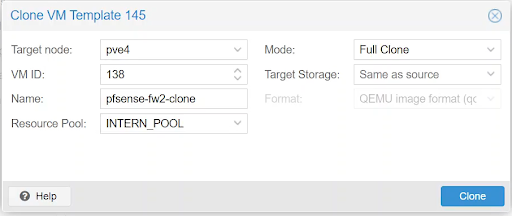
Image 6: The options for cloning a machine. Here we have several options: we can choose what node we want the clone to be in. We have the VM ID, that is the number of the VM in the Proxmox system. We have the name that we want to give the clone and resource pool. The mode of cloning can either be a linked clone or a full clone. Linked clones require the template to be present but use less resources than a full clone that can operate fully independently, but uses more resources. All of the settings should be determined based on the needs of the project and VM IDs should be organized in a way that makes it easy to see what each one is.
How to Clone a Template
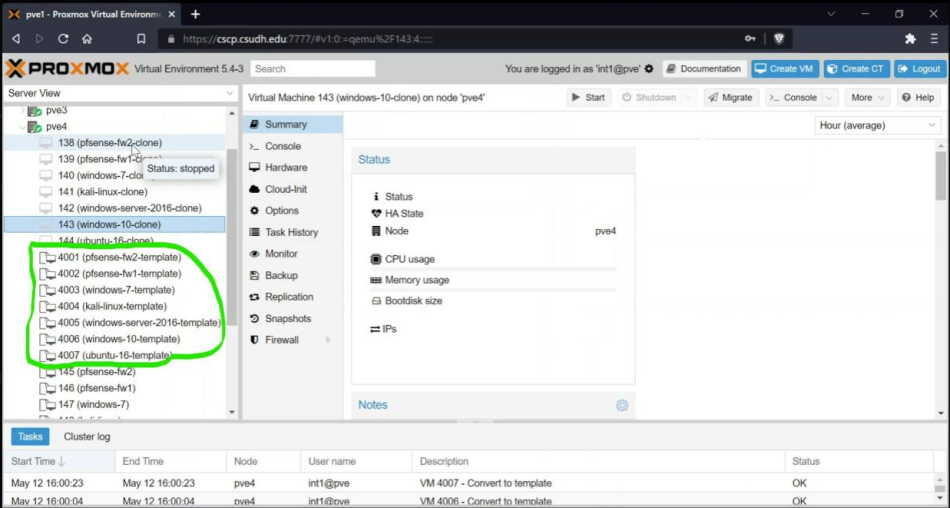
First, when you are on the cscp.csudh.edu website, locate the templates you want to clone. It should be located on the right side of your screen.
Right click on the template you want to clone, and you should see two options.The options are migrate and clone. You will choose clone.
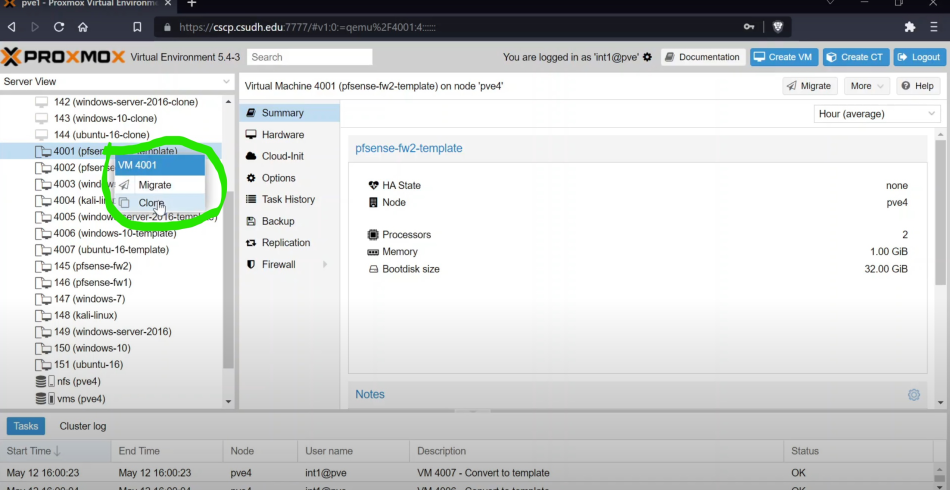
Once you click clone, you will see a small window pop up called “Clone VM Template and the number that was associated with the template.
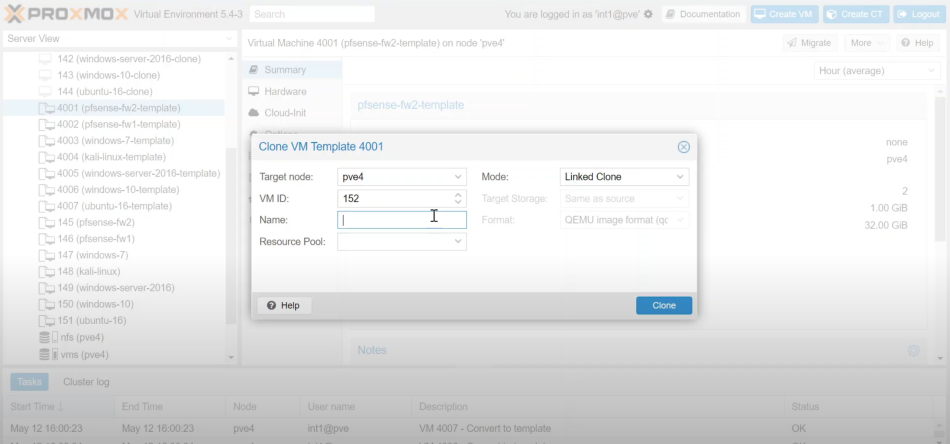
Then you will fill out the information needed.
Target node would be what pve template it belongs to. If the template is from pve4, then the target node should also be pve4.
- VM ID , the first digit should be the pve number. The picture shows that the templates are from pve4 so 4 would be the first digit.
- The next two digits is the set that the clone is in. If the clone is in the first set, then the second and third digit should be 01.
- The last digit should be the machine number you are creating, For example, if its the first machine, it’ll be 1. This will let you create up to 9 machines in each set. In the end, it will look something like “4011”.
- Mode should be a Linked Clone. Since it will be faster to create than a Full Clone.
- Name should be specifically what template you are cloning. For example, if you are cloning 4001 (pfsense-fw2-template), then the clone should be named pfsense-fw2-CloneNumber. So if its the first clone you are creating from the pfsense-fw2 template, it should be called pfsense-fw2-01. - Resource Pool has only one option. Which is INTERN_POOL.
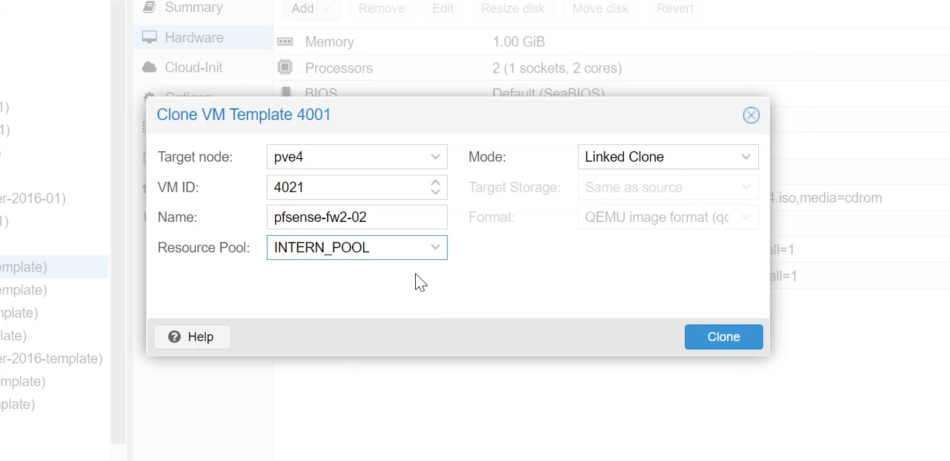
Once you’ve filled the right information out, it should look something similar to the image below. Click Clone and you are done. The clone of the template should show up in the server view on the left side of your screen where all the other clones and templates are located.
- The image below is an example of cloning the template in the second set. Which is why the third digit is 2. Which represents the second set. - The name is slightly different. Instead of pfsense-fw2-01 like I've mentioned in the example, the image shows pfsense-fw2-02 because it is the second set.
First Clone and Correct Numbering
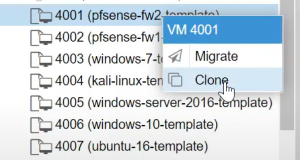
To get started we need to open the correct pve in Proxmox. In this case it is pve4 we will find the machine that we want to clone and then right click on it and then select clone.
Once you select the clone a window will open with several options for you.
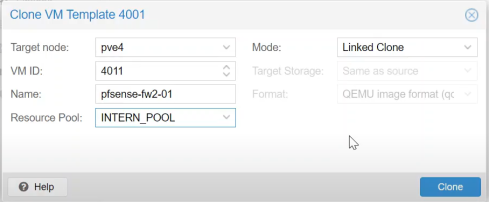
For the numbering system we will be using four digits the first will be the number of the pve in this case 4 so all are machines will start with 4xxx.
The middle two are the number of the set we you are creating, so we will have 401x, 402x, all the way to 410x since we are only creating ten sets.
The last number will be the number of the machine within the set you can see the names a numbers of the machines in the image below.
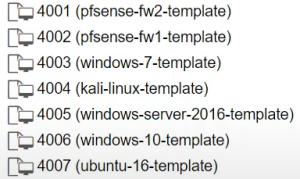
In the name field be sure to add the number of the set you are making to the end. The middle two numbers should be added to the name of the VM when creating it.
Creating First Set of Clones
GUILLERMO SOTOOOOOOOOOOOOOOOOOOOO