Setting Up WRCCDC Clones In ProxMox: Difference between revisions
| Line 1: | Line 1: | ||
== Creating the VMs == | == Creating the VMs == | ||
Creating a VM: | |||
[[File:Figure 1.png|thumb]] | |||
* · First, you are going to select the server, this will be the server you are going to create a VM, that is listed in the instructions. | |||
* · Then select the option in the top right corner “Create VM” | |||
* | |||
* · NOTE: “pve5” currently has no network connection, need to establish that first by creating a firewall. | |||
* | |||
* '''Configuring General tab:''' | |||
[[File:Figure 2.png|thumb| | |||
* | |||
]] | |||
* | |||
* | |||
* · In the figure above, the node is set as “pve5” or it will be named by the server you are currently in. | |||
* | |||
* · The '''VM ID''' will be set to the instructed ID value or using values to describe the server and version of VM (In this case, we labeled the VM ID as 501, the ‘5<sup>th</sup> ‘ server and the ‘01’ version) | |||
* | |||
* · Next, the name. The name should be used to describe the type of VM you are trying to set up to avoid an confusion. | |||
* | |||
* · Referring to the figure, we are creating a firewall with pfsense, and will be naming the vm to describe that the firewall is going to be creating with pfsense. | |||
* | |||
* | |||
* · For “Resource Pool” section you are going to select “INTERN_POOL” | |||
* | |||
* '''Configure OS tab''' | |||
[[File:Figure 3.png|thumb]] | |||
· Here we are going to select the type of OS you are creating | |||
· You are going to select the ISO, we are going to select the ISO image “pfSense”. The other settings are default settings and can be left alone, unless instructed to change the other settings. | |||
· Note: If you are not setting up a pfsense firewall VM the settings must be changed to meet the requirements. | |||
o For example, a Windows VM will require the “Microsoft Windows 10 Pro x64BiT.iso and the type has to be changed to Windows | |||
o Ubuntu will require a “Ubuntu.iso” and a Linux Type. | |||
o Refer to diagram to determine OS type and ISO file. | |||
'''Systems Tab:''' | |||
[[File:Figure 4.png|thumb]] | |||
· In the systems tab the default settings don’t have to be changed, unless instructed otherwise | |||
'''Hard Disk Tab:''' | |||
[[File:Figure 5.png|thumb]] | |||
· In the “Storage” selection, you will be changing from ‘vms’ to ‘vms2’ because there is more storage available than in “vms” | |||
· The other settings can be left at their default settings, unless instructed otherwise | |||
'''CPU Tab''' | |||
[[File:Figure 6.png|thumb]] | |||
· Here, we don’t have to change much, the default settings are ok, but changing the amount of cores can help the VM have faster processing speeds. | |||
· For a Windows7/Ubuntu/Linux VM (to list a few) more cores can be added to help speed things up, i.e. 4 cores. | |||
'''Memory:''' | |||
[[File:Figure 7.png|thumb]] | |||
· Next step is to set the size of memory, this depends on the type of VM | |||
· For the Firewall configuration, not much memory is needed, so 1 GB or 1024 MB will suffice. | |||
· For a Windows7/Ubuntu/Linux VM (to list a few) more memory can be added, 8GB of RAM or 8192MB is more than enough. | |||
'''Network:''' | |||
[[File:Figure 8.png|thumb]] | |||
''' ''' | |||
· Then, you are going to need to connect the vm ‘pfsense’ to the outside world, in this case vmbr2 will be used because it is configured. | |||
· Note: When creating the instructed VMs, here is where the vmbr selection is crucial. Referring to the diagram provided by the instructions, | |||
o the '''WINDOWS 7, KALI Linux, Ubuntu''' virtual machine have to be connected to '''vmbr12'''. | |||
o The '''Windows Server, Windows 10, VM''' vmbr is '''vmbr16''' | |||
'''Confirm Tab:''' | |||
[[File:Figure 9.png|thumb]] | |||
· Confirm all the settings and click ‘Finish’ | |||
'''Check Created VM:''' | |||
[[File:Figure 10.png|thumb]] | |||
· After confirming the settings enabled, after waiting for a couple seconds, check the status on the bottom right corner. (If any errors, click on the edit tab and edit the settings, or you can recreate the VM by deleting it and trying again.) | |||
· Congratulations you just created a VM on Proxmox! | |||
· Note: The firewall VM needs a LAN and WAN Configuration | |||
'''Firewall LAN and WAN Interface Configuration:''' | |||
[[File:Figure 11.png|thumb]] | |||
· At the bottom of the “Hardware tab” we have a network Device called ‘Network Device (net0)’ this is the current WAN interface, but we also need a LAN interface | |||
· To add another Network Device, click on the “Add” tab and click on “Network Device” | |||
[[File:Figure 12.png|thumb]] | |||
· For this network device, we need to create a network within the network. | |||
· (Note: The one we selected earlier,‘vmbr2’ is for the WAN interface | |||
[[File:Figure 13.png|thumb]] | |||
· Now, you have successfully created and configured a firewall | |||
'''Creating second Firewall''' | |||
· Now you must create a second firewall, following the same steps above up until ‘Figure 8’ you are going to need to do a small change. | |||
[[File:Figure 14.png|thumb]] | |||
· For the second firewall, you need to use the LAN, that was configured in the first firewall, and be set as the WAN | |||
· In this case ‘vmbr12’ was set as the WAN. | |||
[[File:Figure 15.png|thumb]] | |||
· Continue with the creation of the second firewall VM and you will need to create a network device to the second firewall VM. | |||
· Here we are going to set the LAN interface to ‘vmbr16’ this is going to be the 10 | |||
· Note: vmbr2 is the connection to the outside world, vmbr12 is the 172.30.35 interface, vmbr16 is the 10.0.13 interface. (For the Windows7/Ubuntu/Linux VM) vms will need to be connected according to the diagram provided.) | |||
== Installing and Configuring the VMs == | == Installing and Configuring the VMs == | ||
Latest revision as of 20:27, 20 May 2022
Creating the VMs[edit | edit source]
Creating a VM:
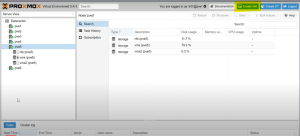
- · First, you are going to select the server, this will be the server you are going to create a VM, that is listed in the instructions.
- · Then select the option in the top right corner “Create VM”
- · NOTE: “pve5” currently has no network connection, need to establish that first by creating a firewall.
- Configuring General tab:
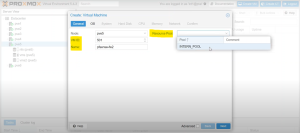
- · In the figure above, the node is set as “pve5” or it will be named by the server you are currently in.
- · The VM ID will be set to the instructed ID value or using values to describe the server and version of VM (In this case, we labeled the VM ID as 501, the ‘5th ‘ server and the ‘01’ version)
- · Next, the name. The name should be used to describe the type of VM you are trying to set up to avoid an confusion.
- · Referring to the figure, we are creating a firewall with pfsense, and will be naming the vm to describe that the firewall is going to be creating with pfsense.
- · For “Resource Pool” section you are going to select “INTERN_POOL”
- Configure OS tab
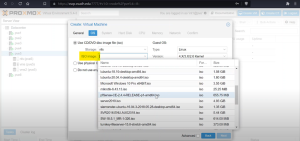
· Here we are going to select the type of OS you are creating
· You are going to select the ISO, we are going to select the ISO image “pfSense”. The other settings are default settings and can be left alone, unless instructed to change the other settings.
· Note: If you are not setting up a pfsense firewall VM the settings must be changed to meet the requirements.
o For example, a Windows VM will require the “Microsoft Windows 10 Pro x64BiT.iso and the type has to be changed to Windows
o Ubuntu will require a “Ubuntu.iso” and a Linux Type.
o Refer to diagram to determine OS type and ISO file.
Systems Tab:
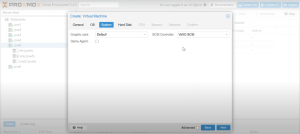
· In the systems tab the default settings don’t have to be changed, unless instructed otherwise
Hard Disk Tab:
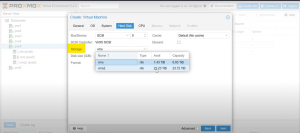
· In the “Storage” selection, you will be changing from ‘vms’ to ‘vms2’ because there is more storage available than in “vms”
· The other settings can be left at their default settings, unless instructed otherwise
CPU Tab
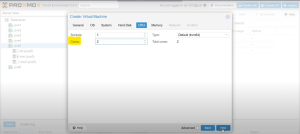
· Here, we don’t have to change much, the default settings are ok, but changing the amount of cores can help the VM have faster processing speeds.
· For a Windows7/Ubuntu/Linux VM (to list a few) more cores can be added to help speed things up, i.e. 4 cores.
Memory:
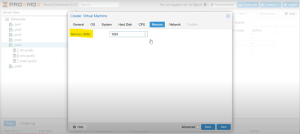
· Next step is to set the size of memory, this depends on the type of VM
· For the Firewall configuration, not much memory is needed, so 1 GB or 1024 MB will suffice.
· For a Windows7/Ubuntu/Linux VM (to list a few) more memory can be added, 8GB of RAM or 8192MB is more than enough.
Network:
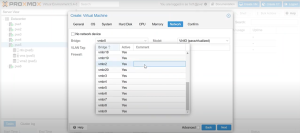
· Then, you are going to need to connect the vm ‘pfsense’ to the outside world, in this case vmbr2 will be used because it is configured.
· Note: When creating the instructed VMs, here is where the vmbr selection is crucial. Referring to the diagram provided by the instructions,
o the WINDOWS 7, KALI Linux, Ubuntu virtual machine have to be connected to vmbr12.
o The Windows Server, Windows 10, VM vmbr is vmbr16
Confirm Tab:
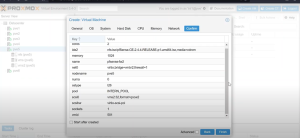
· Confirm all the settings and click ‘Finish’
Check Created VM:
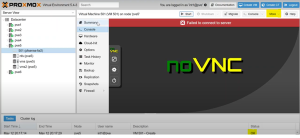
· After confirming the settings enabled, after waiting for a couple seconds, check the status on the bottom right corner. (If any errors, click on the edit tab and edit the settings, or you can recreate the VM by deleting it and trying again.)
· Congratulations you just created a VM on Proxmox!
· Note: The firewall VM needs a LAN and WAN Configuration
Firewall LAN and WAN Interface Configuration:
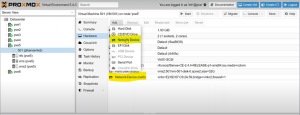
· At the bottom of the “Hardware tab” we have a network Device called ‘Network Device (net0)’ this is the current WAN interface, but we also need a LAN interface
· To add another Network Device, click on the “Add” tab and click on “Network Device”
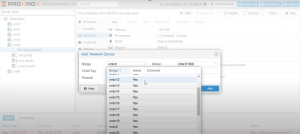
· For this network device, we need to create a network within the network.
· (Note: The one we selected earlier,‘vmbr2’ is for the WAN interface
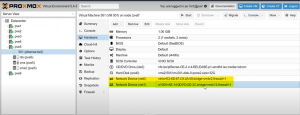
· Now, you have successfully created and configured a firewall
Creating second Firewall
· Now you must create a second firewall, following the same steps above up until ‘Figure 8’ you are going to need to do a small change.
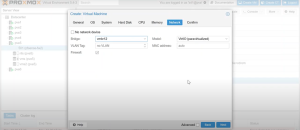
· For the second firewall, you need to use the LAN, that was configured in the first firewall, and be set as the WAN
· In this case ‘vmbr12’ was set as the WAN.
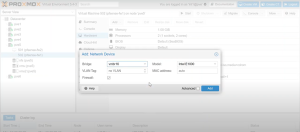
· Continue with the creation of the second firewall VM and you will need to create a network device to the second firewall VM.
· Here we are going to set the LAN interface to ‘vmbr16’ this is going to be the 10
· Note: vmbr2 is the connection to the outside world, vmbr12 is the 172.30.35 interface, vmbr16 is the 10.0.13 interface. (For the Windows7/Ubuntu/Linux VM) vms will need to be connected according to the diagram provided.)
Installing and Configuring the VMs[edit | edit source]
After creating all the needed virtual machines, it is important to go through each machine and check the setting to see if everything is configured correctly. First It is important to check that all the virtual machines are assigned to the correct vmbr. Once we have checked all the machines and made the necessary changes, it's essential to start the configuration process with the firewall to make the rest of the process easy. To do that we have to click start on the first firewall machine to start installation and confirmation.
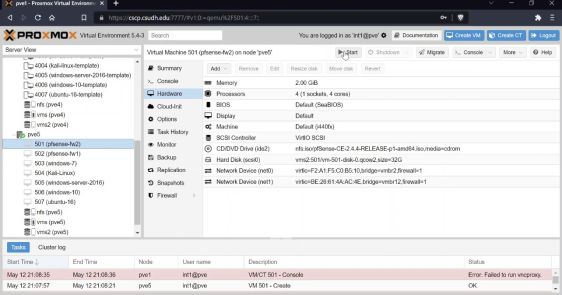
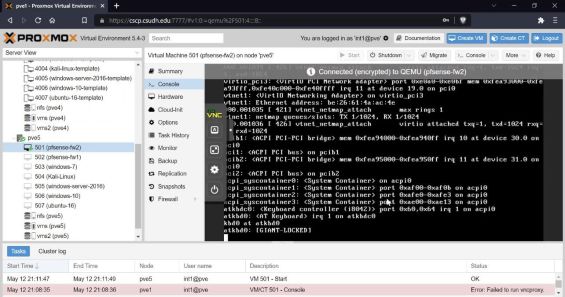
After starting the machine click on the console section to view the start process on the screen. It will normally take a few minutes for the machine to boot into bios.
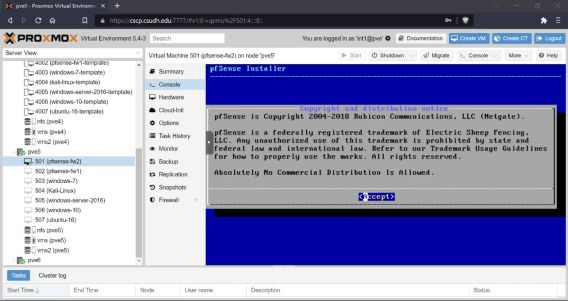
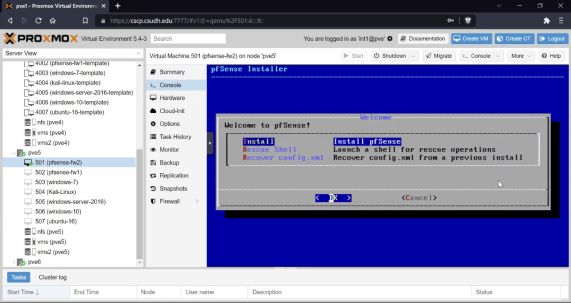
Accept the agreement and select install pfSense as shown above. For the rest of the installation process, select the default option and continue the installation process as shown in the following images. (Note: it will take some time to install and we will have to wait patiently)
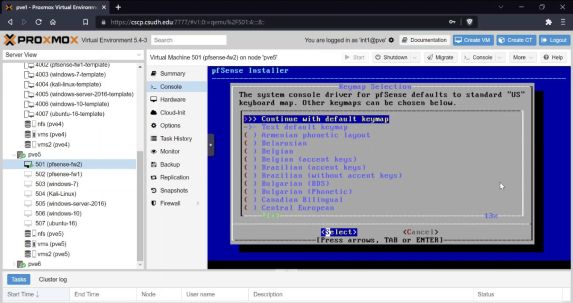
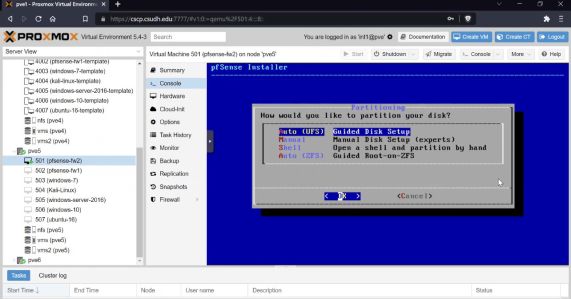
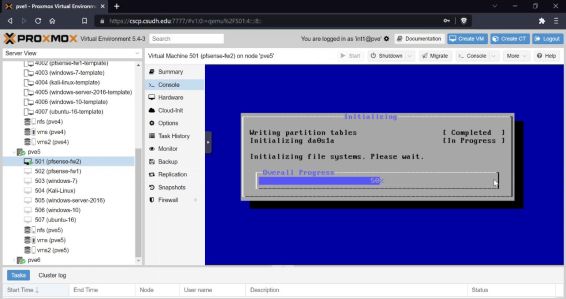
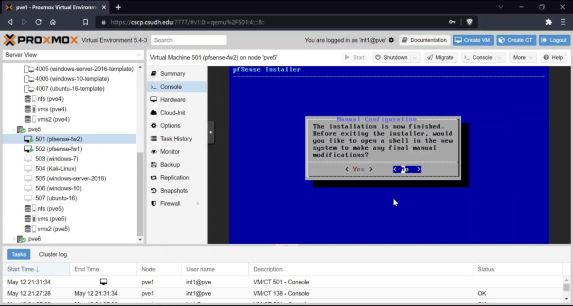
After the installation process is done it will ask us if we would like to open a shell in the new system and we will select ‘no’ and continue into the installed system.
After we reboot into the installed system we can continue to configure the firewall system as shown in the following images:
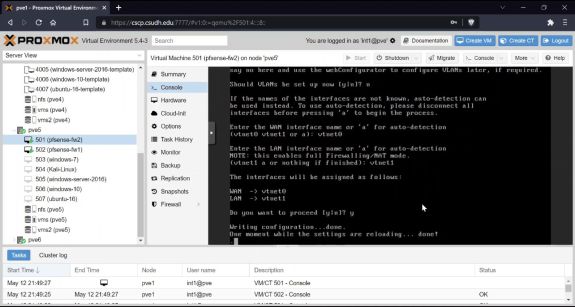
We will select ‘no’ for the VLAN step-up option and enter the WAN interface, which is vtnet0. That is the interface connected to vbmr and connects us to the wide-area network. We will type vtnet1 for the LAN interface.
We would need to fix the setups for the LAN interface as followed:
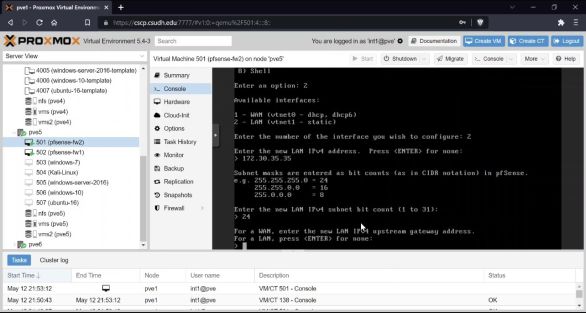
Since we are trying to configure the LAN interface we will type 2 to select LAN and enter the new LAN IPv4 address, which will be 172.30.35.35. For the subnet, we will select the number 24 because it is a class C network and we will just hit enter for the following two steps. We should also enable the DHCP server on the LAN to help make things smooth.
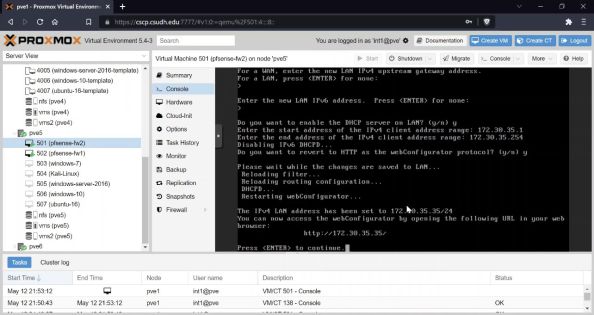
Once the first firewall is configured we can repeat the same steps to configure the second firewall. Since the DHCP server on the first firewall is up and running, we can connect to the second firewall to help speed up the configuration process. It's should also type 'yes' for "do you want to revert to HTTP as the webConf inguration ptotocol?'. This will help us easly access the machine from a web browser. One the configration process is complete we are able to access the control panale by going to http://172.38.35.35/. Besides changeing the password after the systems are intalled and running, our firewall is configured and ready to be used. We will repeat the same process with the configuration processes for the second firewall (pfsense-fw1) except will enter the 10.0.13.1 for the LAN IPv4 address. We will set-up our IPv4 address range between 10.0.13.2 to 10.0.13.254, which then gives us the address http://10.0.13.1/ to connect to our firewall on a web browser.
After the configuration for the firewall is completed we can then install the oprating systems for all the systems. The installation process for all the systems is a very easy process. we can select the default option for the most part excep the user name and password sections.
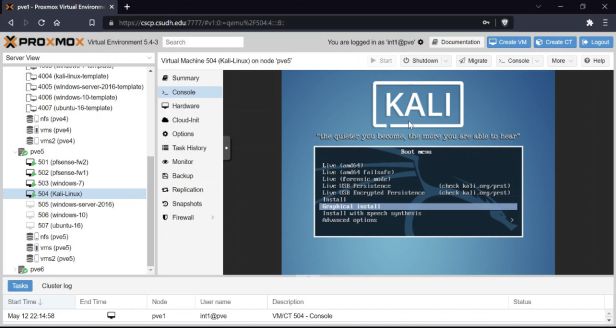
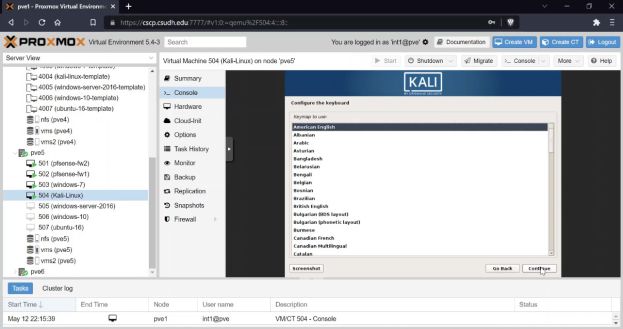
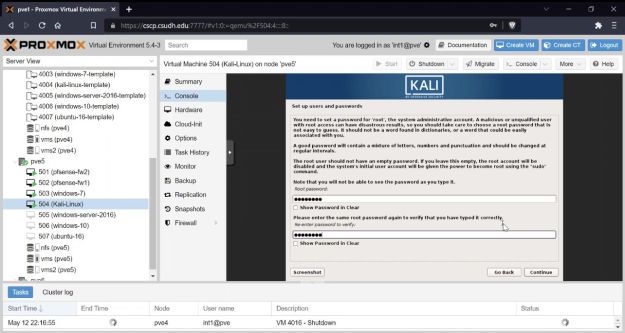
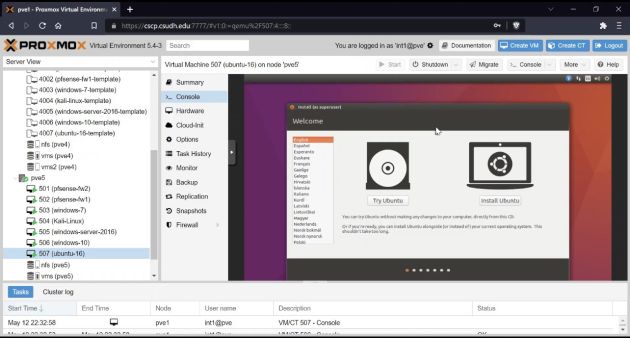
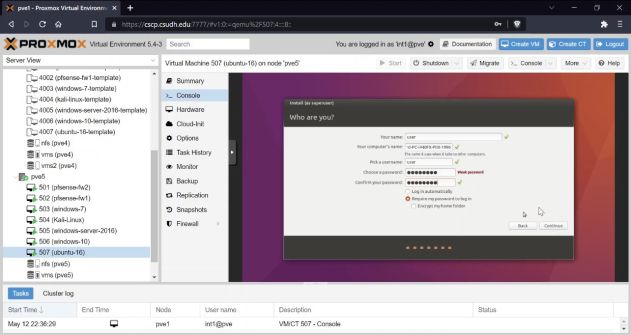
For Kali Linux and Ubuntu it will ask as to creat user name and passord in the beginning of the installation process. We can use 'user' for the user and 'pasword' for the password all small letters. We should alos make sure to select the correct preffered language, choose location, and set the time.
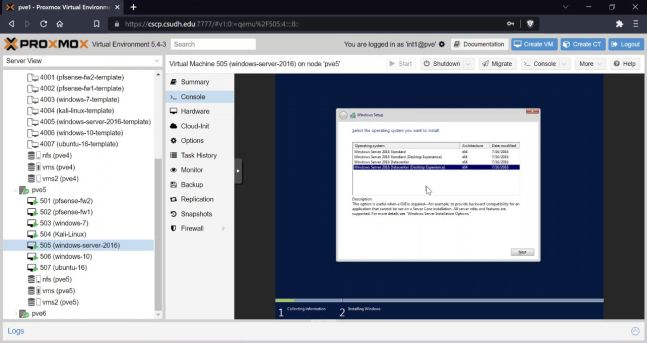
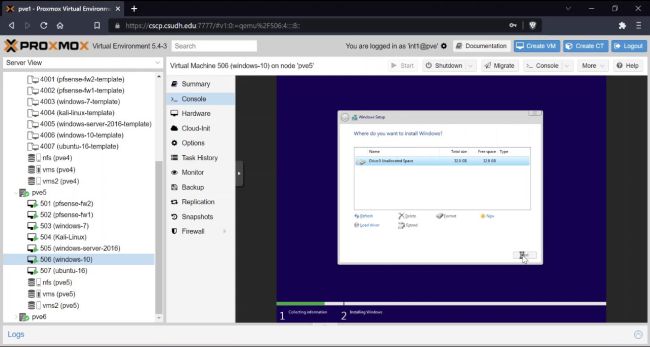
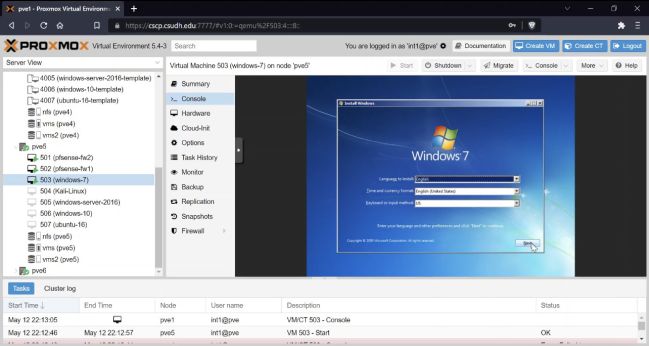
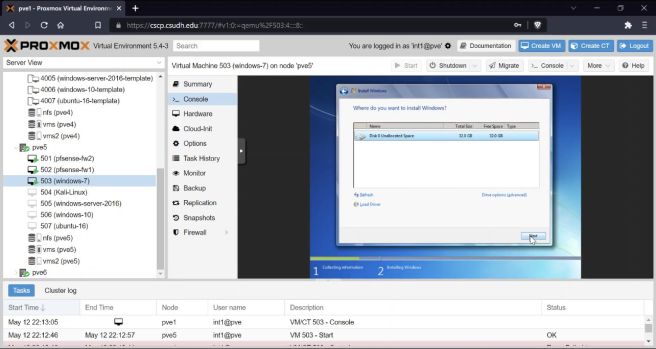
Besides the user name and password step, we fallow the same process to install the windows system. For windows the user name and password is created after the installation process is done. We also have to make sure to select the correct location, time, and language. For example, if we are located in United Stated we have to select that as our location. The installation process for windows usually take time and we would have to wait patiently for the systems to finish installing. As for the password and user name, it will most likely be provided as part of the task and we may follow the above instrations to complete it correctly.
Convert to Template and Begin to First Clone[edit | edit source]
Now that you have completed the virtual machines we can turn them into templates for cloning in the Proxmox system. First thing we need to do is make sure that all the machines that you want to turn into templates are turned off. In Proxmox you will want to select each machine and connect to it and use the console tab to view the machine. We want to shut down the machine manually using virtual machines operating systems' normal method to turn it off in order to minimize the chance of a shut down error being cloned to the new machines. When the machine is fully shut down the screen will look like this.

Image1: Console view of a fully shut down machine. Some machines will shut down quickly but others like the windows machine or pfsense may take several minutes to shutdown. If the machine gets stuck shutting down you can manually stop the machine by clicking the arrow on the shutdown button at the top of the viewer. From there you can select ‘stop’ to immediately stop the machine.

Image 2: The stop button in the drop down menu from the shutdown button. Now that all the machines are turned off we can convert them to templates. To do this you will right click on the machine you want to make into a template and from there you can select ‘convert to template’ then you will confirm and the selected machine is the one you want to turn into a template.
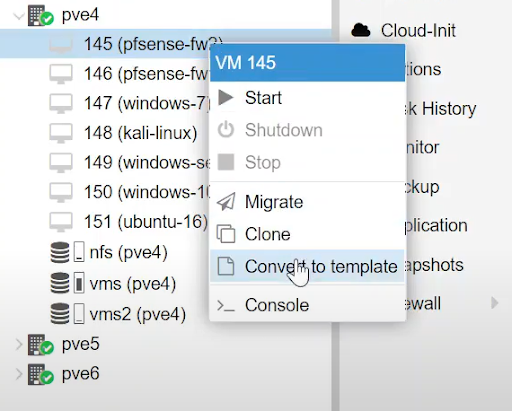
Image 3: right click and selecting convert to template. Once the template is made the icon of the machine will change.

Image 4: You can see the first three have been converted into templates. Repeat the process for all the machines you want to convert. Now we are ready to start cloning machines, to get started you will need to right click on the template that you want to clone and then select the ‘clone’ option.
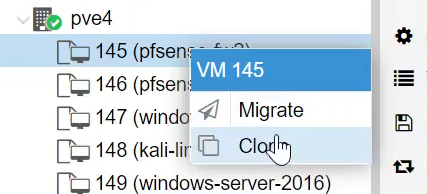
Image 5: right click and select clone to start cloning the machine. Once you click the clone button a window will appear with several options.
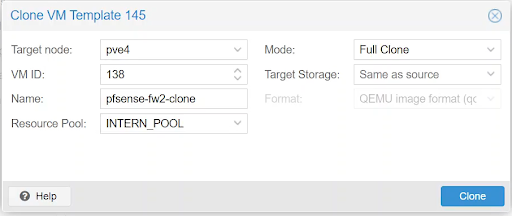
Image 6: The options for cloning a machine. Here we have several options: we can choose what node we want the clone to be in. We have the VM ID, that is the number of the VM in the Proxmox system. We have the name that we want to give the clone and resource pool. The mode of cloning can either be a linked clone or a full clone. Linked clones require the template to be present but use less resources than a full clone that can operate fully independently, but uses more resources. All of the settings should be determined based on the needs of the project and VM IDs should be organized in a way that makes it easy to see what each one is.
How to Clone a Template[edit | edit source]
First, when you are on the cscp.csudh.edu website, locate the templates you want to clone. It should be located on the right side of your screen.
Right click on the template you want to clone, and you should see two options.The options are migrate and clone. You will choose clone.
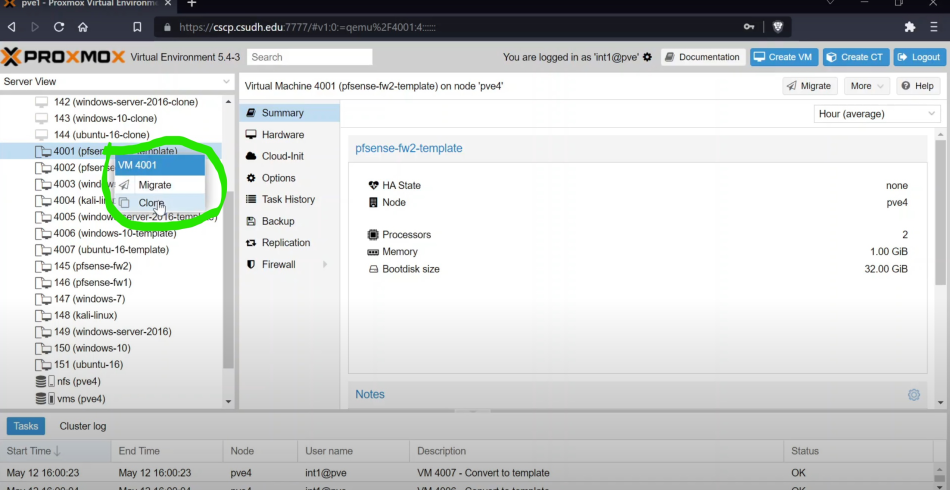
Once you click clone, you will see a small window pop up called “Clone VM Template and the number that was associated with the template.
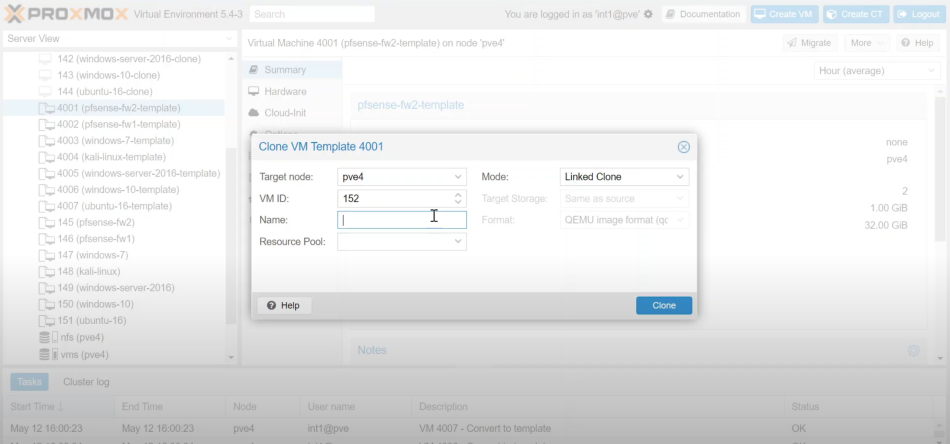
Then you will fill out the information needed.
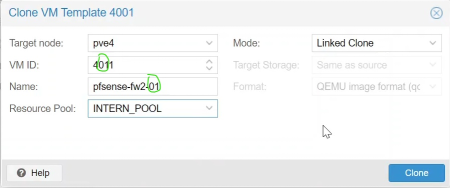
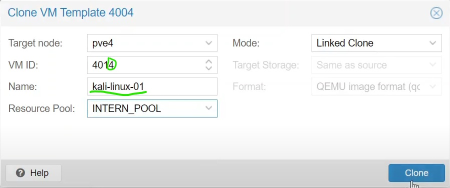
Target node would be what pve template it belongs to. If the template is from pve4, then the target node should also be pve4.
- VM ID , the first digit should be the pve number. The picture shows that the templates are from pve4 so 4 would be the first digit.
- The next two digits is the set that the clone is in. If the clone is in the first set, then the second and third digit should be 01.
- The last digit should be the machine number you are creating, For example, if its the first machine, it’ll be 1. This will let you create up to 9 machines in each set. In the end, it will look something like “4011”.
- Mode should be a Linked Clone. Since it will be faster to create than a Full Clone.
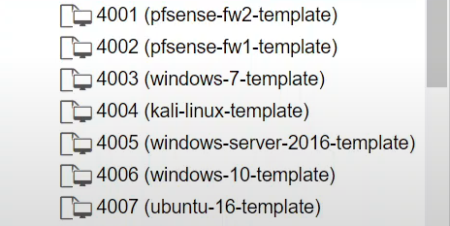
- Name should be specifically what template you are cloning. For example, if you are cloning 4001 (pfsense-fw2-template), then the clone should be named pfsense-fw2-CloneNumber. So if its the first clone you are creating from the pfsense-fw2 template, it should be called pfsense-fw2-01. - Resource Pool has only one option. Which is INTERN_POOL.
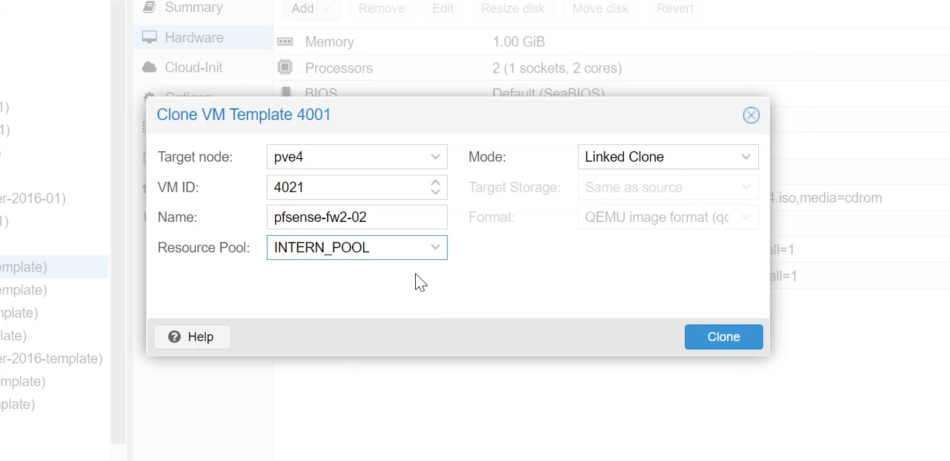
Once you’ve filled the right information out, it should look something similar to the image below. Click Clone and you are done. The clone of the template should show up in the server view on the left side of your screen where all the other clones and templates are located.
- The image below is an example of cloning the template in the second set. Which is why the third digit is 2. Which represents the second set. - The name is slightly different. Instead of pfsense-fw2-01 like I've mentioned in the example, the image shows pfsense-fw2-02 because it is the second set.
First Clone and Correct Numbering[edit | edit source]
To get started we need to open the correct pve in Proxmox. In this case it is pve4 we will find the machine that we want to clone and then right click on it and then select clone.
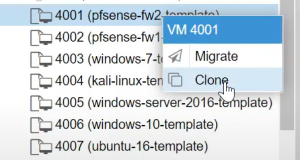
Once you select the clone a window will open with several options for you.
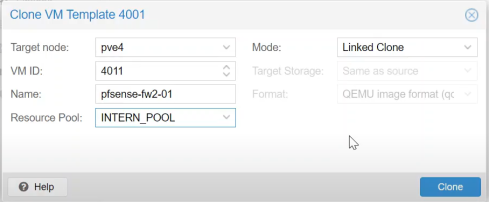
For the numbering system we will be using four digits the first will be the number of the pve in this case 4 so all are machines will start with 4xxx.
The middle two are the number of the set we you are creating, so we will have 401x, 402x, all the way to 410x since we are only creating ten sets.
The last number will be the number of the machine within the set you can see the names a numbers of the machines in the image below.
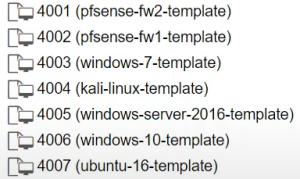
In the name field be sure to add the number of the set you are making to the end. The middle two numbers should be added to the name of the VM when creating it.
Creating First Set of Clones[edit | edit source]
When creating the first set of clones. Always start with the first template. Which will be pfsense-fw2 and work your way down until you reach ubuntu-16.
A. When filling out the information for machine one which would be pfsense-fw2, remember that the second and third digit of the VM ID is always 01 because that represents the set number. Have 1 as the last digit since this is the first machine. As well as replacing template with the set number in the Name part. Everything else should match with what the picture below is showing.
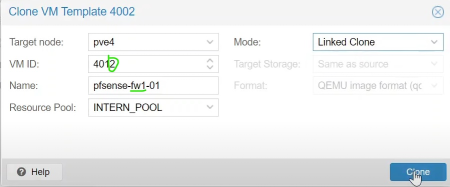
B. The next machine will be pfsense-fw1. Every information should match with the first machine but you will need to change the name to the name of the second template. Which would be pfsense-fw1. As well as having the last digit in the VM iD be 2 since this is the second machine.
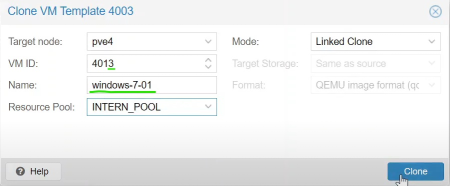
C. Same process as before.but since this is the 3rd machine in the set, the VM ID will be 4013. The name will be windows-7-01
D. 4th machine will be 4014. With the name kali-linux-01
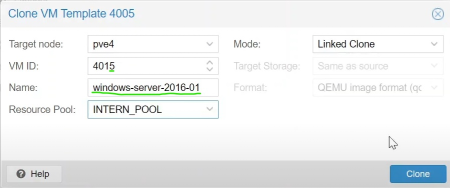
E. 5th machine will be named windows-server-2016-01. With the VM ID being 4015
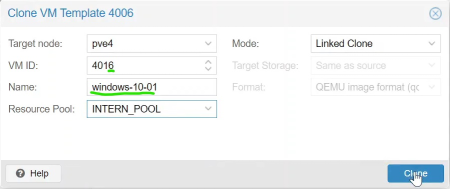
F. 6th machine will be named windows-10-01. With the VM ID being 4016
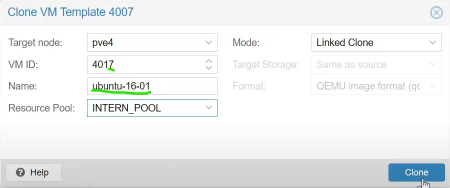
G. Final machine will be called ubuntu-16-01. With the VM iD being 4017.
Once you've completed the 7th machine, You have finished cloning the first set of machines.
Testing[edit | edit source]
Once you have the clones created, you are now going to test if they are working. To do that, you will need to have each machine ping each other.
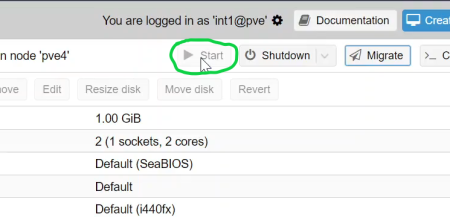
But first you will need to start the machines. Make sure you start with the first machine of the set. Which would be pfsense-fw2-01
Once you start it should see a green arrow next to the VM IDon the server view
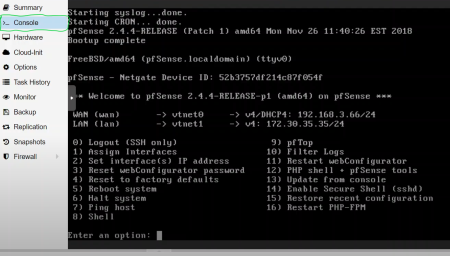
Once you start the machine, You are going to click Console and you should see a list of text. That is the system booting up.
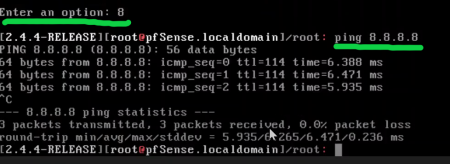
Once you see Enter an option: , type 8 and then ping 8.8.8.8 . You should be able to ping and receive packets.
Now we move on to the next machine pfsense-fw1. Repeat the same process as before. Turn on the machine and go to the console. The start button is always going to be in the same location. You should see a list of text when you click console and wait until you see “Enter an option:”.
To make the testing process quick, you can start up the rest of the machines in the set. From windows-7 to ubuntu. You are going to have to wait a bit for those machines to boot up as well.
Once you have booted all of the other systems up, each machine will ask for a log in.
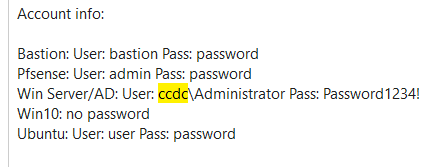
This is the login information for the machines.
A key thing to remember
- If the username isn't specified, then the username is “user.
- If the password isn't specified, the password is “password”
- Kali-linux machine login should be kali
- Type ipconfig /all on command prompts to pull up information about the machine’s IP address. For linux machines type ifconfig in the terminal
When you have logged into the machines, You are going to pull up the command prompt or terminal depending on the machine.
To pull of the terminal on the ubuntu machine and kali linux machine, you press control + alt + T To get the command prompt for the windows machine, you can simply click the windows icon on the bottom left and search “cmd”.
For the windows-server-2016, when it boots up, you are going to need to do something in order to get to the log in.
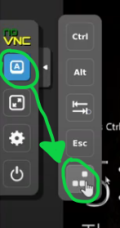
Click on the arrow that is located on the left side of the screen of the machine and you press the A symbol. Once you do that you will click on the image that shows 3 boxes and that is located in the bottom of the little window that pops up when you click the A symbol.
When you do all of that, it should take you to the login of that machine and the login information for that is in the previous picture with the account information.
Now you are going to test the windows-7 machine by pinging the firewall which is 172.30.35.35 you should get a reply
Next test is pinging the kali-linux machine from the windows-7 machine by pinging 172.30.35.3 If you get a reply, then that's good.
Last test is to ping 8.8.8.8
Move on to the next machine when you are done pinging
The next machine will be the kali-linux machine and you will see if it can reach the windows-7 machine by pinging 172.30.35.5
After that, ping the default gateway. Which is 172.30.35.35
Last thing will be to ping 8.8.8.8
Assuming you got replies on all pings, you can move on to the next machine
Next machine is the windows-server-2016. Ping the default gateway 10.0.13.1
Next ping the windows-10 machine - 10.0.13.4
Next ping is the linux machine - 10.0.13.5
Last ping is 8.8.8.8
Next machine will be the windows-10. First ping will be 10.0.13.1
Next ping is 10.0.13.2
Ping linux machine - 10.0.13.5
Last ping is the same ping - 8.8.8.8
Finally, the last machine to test is the ubuntu-16. First ping is 10.0.13.1
Ping the server - 10.0.13.2
Ping the windows-10 machine - 10.0.13.4
Last ping is 8.8.8.8
Once you are done with testing the ubuntu you can exit all the terminals and command prompts. You are finally done testing all the machines. If they all can ping each other then the test was a success.
Cleanup[edit | edit source]
Now we will clean up our system, now that we have tested that our clones work we can remove any extra VMs we may have created. We want to keep all the VMs that match our numbering system.
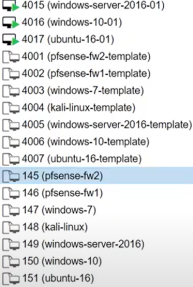
All the machines that do not start with 4 can be removed. To do this select the machine that we want to remove it will open in area to the right. Then we will click more and then remove.
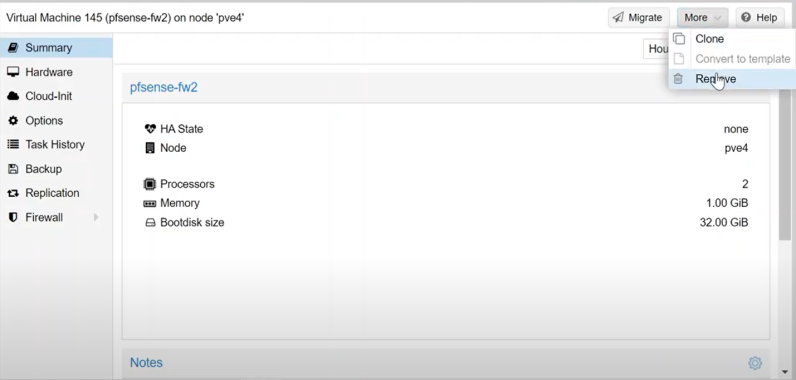
A new window will open prompting us to enter the number of the VM we are deleting to confirm before deleting.

If you are asked to delete a VM that number starts with the number 4 this is the wrong VM and you need to cancel out and select the correct VM
Networking and Conclusion[edit | edit source]
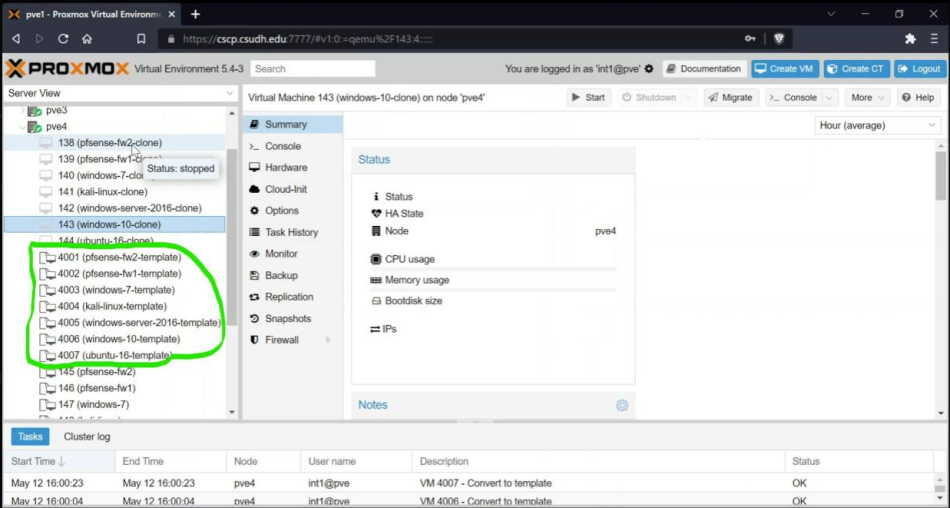
After cleaning up all unneeded clones we can see what pve4 will look like with the templates and the first sets of clones.
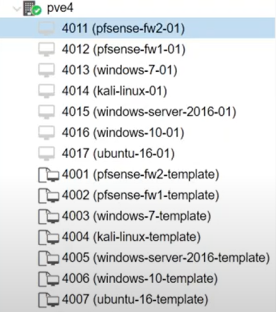
One thing you will notice is that all the clones are using the same vmbr number this is wrong.
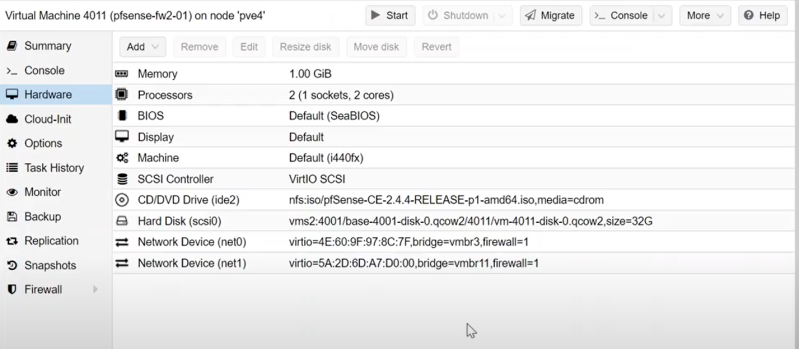
Unfortunately in order to change the vmbr we need admin privileges' to do that so we will need to have someone with the admin permissions do it.
The intern accounts we have used to make this this do not have admin privileges' and so we will have to leave this part in the hands of someone else.
